How does a DNS lookup work step by step?
If you’ve ever typed a website address into your browser, you’ve likely used DNS without even knowing it. DNS stands for Domain Name System, and it’s what translates human-readable website names into something that computers can understand—numbers. Think of it as a phonebook for the internet. In this article, we’ll walk you through the simple process of how a DNS lookup works step by step, using easy-to-understand language.
1. What is DNS?
Before diving into the steps, let’s break down what DNS actually is. Every website on the internet has a unique number, called an IP address, which helps computers find each other. However, remembering a series of numbers like 192.168.1.1 is pretty hard for us humans! So, DNS helps by turning those hard-to-remember numbers into friendly website names like www.google.com.
2. The First Step: Typing the Website Address
When you want to visit a website, you open your web browser and type in the address (like www.example.com). But, your computer can’t understand that name directly—it needs the IP address to find the site.
This is where DNS comes into play. Here’s how it works:
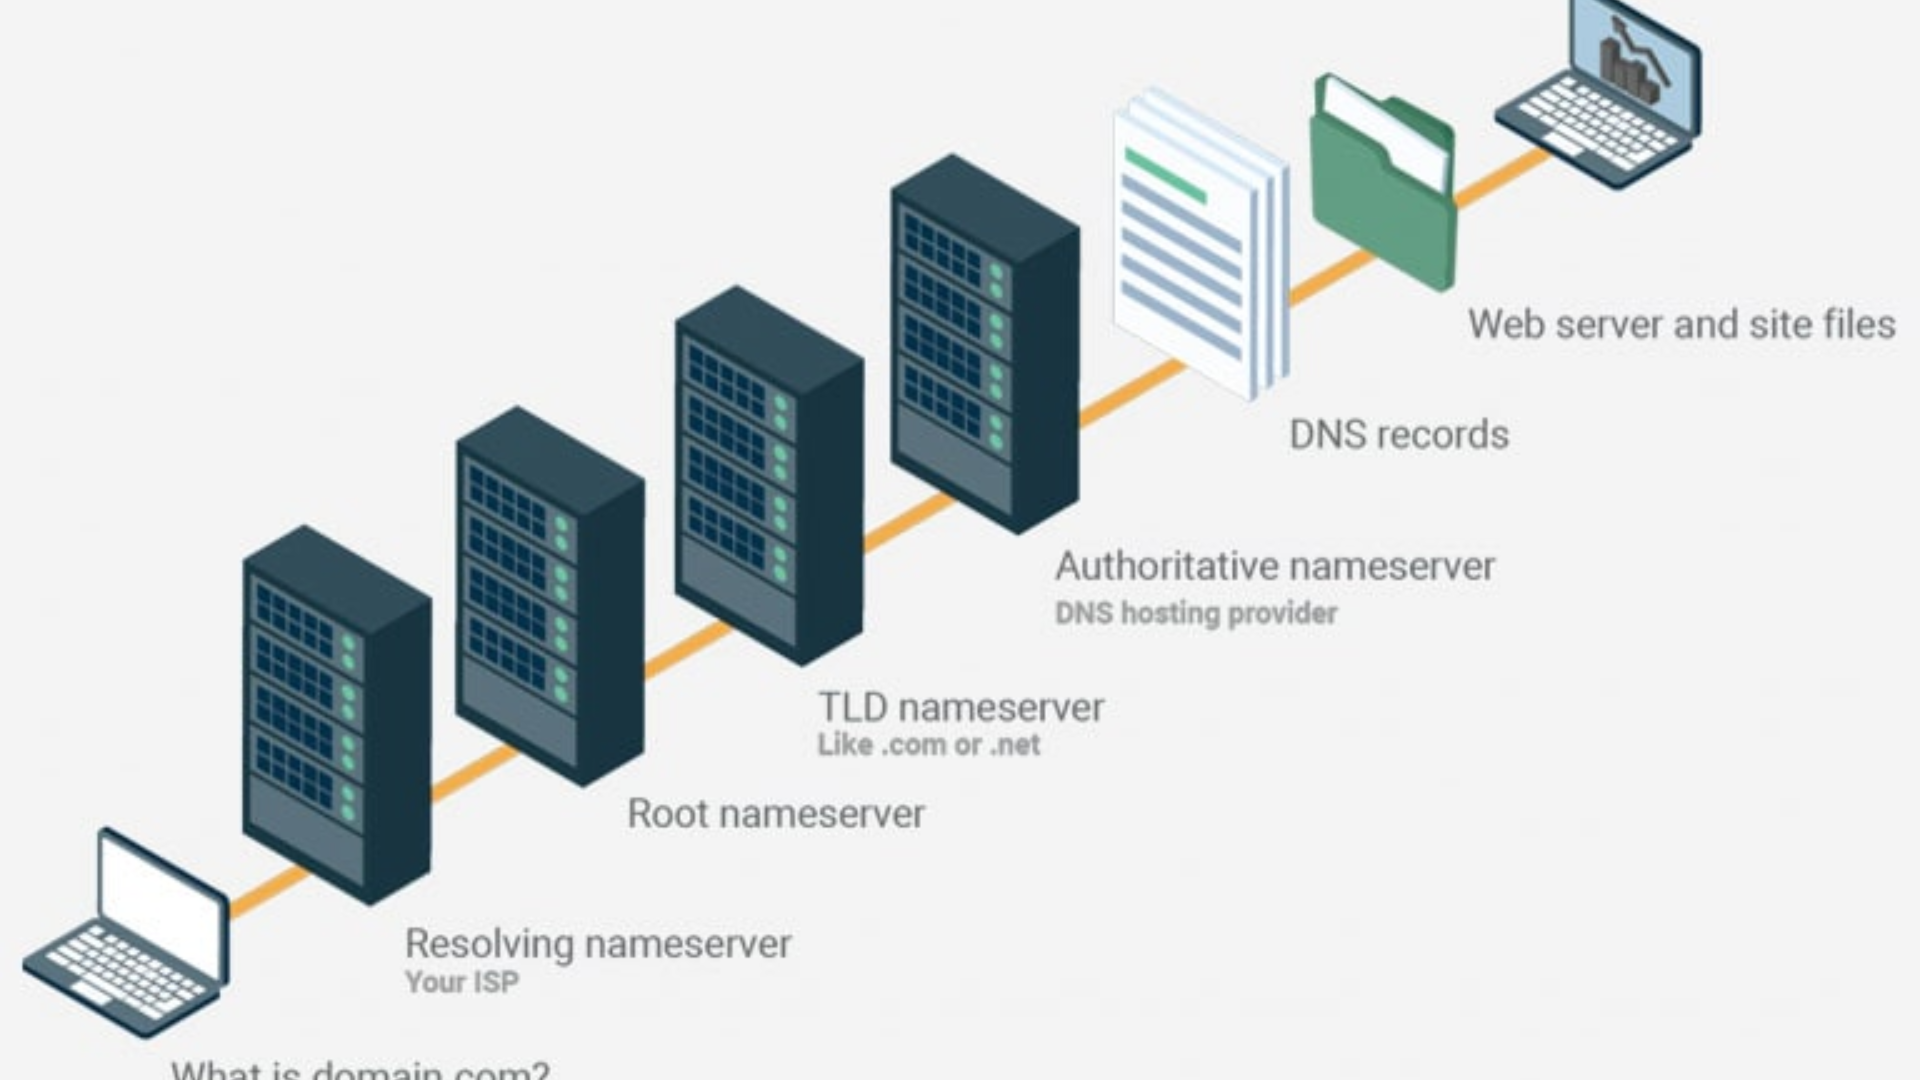
3. Your Device Checks Its Own Cache
The first thing your computer does is check if it already knows the IP address for that website. It keeps a DNS cache with recently looked-up website addresses and their IP addresses. If the site is in that cache, your computer can skip the rest of the steps and immediately connect to the website.
4. Asking the Local DNS Server
If the address isn’t in your computer’s cache, it needs to ask a DNS server for help. This is usually provided by your internet service provider (ISP). So, your computer sends a request to the local DNS server asking for the IP address of the website.
What Does the Local DNS Server Do?
The local DNS server will first check its own cache. If it has the answer, it sends it back to your computer. If not, it needs to search further.
5. Asking the Root DNS Servers
If the local DNS server doesn’t know the IP address, it asks one of the root DNS servers. These servers are like the big libraries of the internet, knowing where to find information about different types of websites.
What Happens at the Root Level?
The root DNS server doesn’t know the IP address either but can point the local DNS server to a TLD (Top-Level Domain) DNS server. These servers manage the “.com,” “.org,” or “.net” part of the domain name.
6. Asking the TLD DNS Server
Once the local DNS server knows which TLD DNS server to ask (e.g., for “.com” websites, it goes to the .com TLD server), it sends a request to that server.
What Happens at the TLD Level?
The TLD DNS server knows which authoritative DNS server is in charge of the specific website you’re trying to reach. For example, if you’re looking for www.google.com, the .com TLD server will know where to send the request for Google’s server.
7. Asking the Authoritative DNS Server
Finally, the local DNS server asks the authoritative DNS server for the website. This server has the final answer—it knows the exact IP address for the website you’re looking for.
Once it gets the answer, the authoritative DNS server sends the IP address back to the local DNS server.
8. Your Computer Connects to the Website
Once the local DNS server has the IP address, it sends it back to your computer. Now that your device has the number it needs, it can connect to the website’s server and load the website.
9. Caching the Answer for Future Use
To speed up future lookups, your computer (and the local DNS server) will cache the IP address it just found. This way, if you visit the same site again soon, it can skip most of the steps and get you there faster.
Summary of the DNS Lookup Process
Here’s a quick recap of the steps:
- You type a website address into your browser.
- Your device checks its cache for the IP address.
- If it doesn’t find it, your device asks the local DNS server for the IP address.
- If the local DNS server doesn’t know, it asks the root DNS server for help.
- The root server points it to the TLD DNS server.
- The TLD DNS server sends it to the authoritative DNS server.
- The authoritative server gives the IP address back.
- Your device can now connect to the website.
- Caching happens to speed up future visits.
Conclusion
As you can see, the process of looking up a website’s IP address is a bit like asking around for directions until you get the right answer. Thankfully, all of this happens in just a fraction of a second, so you don’t have to worry about the details. The next time you type in a web address, you can appreciate how DNS helps make the internet easier to navigate!