How to secure my DNS server?
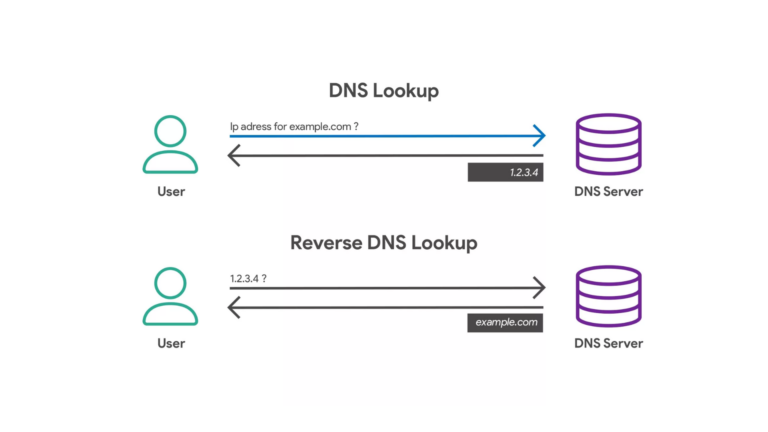
When it comes to keeping your internet safe and sound, your DNS (Domain Name System) server plays a big role. It’s the system that helps convert domain names (like www.example.com) into IP addresses that computers can understand. If your DNS server is not properly secured, it can leave your network open to attacks and misuse. In this article, I’ll show you simple steps to make sure your DNS server is as secure as possible.
Why Should You Secure Your DNS Server?
Before we dive into the how, it’s important to know why securing your DNS server matters:
- Prevent attacks: Hackers can exploit a vulnerable DNS server to redirect your internet traffic to malicious websites.
- Enhance privacy: Securing your DNS helps keep your browsing history and personal information safe.
- Improve performance: A secure DNS server reduces the risk of downtime and ensures your internet runs smoothly.
Step 1: Use DNSSEC (DNS Security Extensions)
DNSSEC adds an extra layer of security to your DNS queries. It’s like putting a lock on your DNS server so attackers can’t tamper with the responses.
- What it does: DNSSEC ensures that the DNS responses your server receives are authentic and haven’t been altered.
- Why it’s important: Without DNSSEC, attackers can manipulate DNS responses, which can lead to serious problems like phishing and malware attacks.
How to Set It Up:
- Check if your DNS provider supports DNSSEC.
- Enable DNSSEC on your domain registrar’s website.
- Make sure your DNS server is configured to handle DNSSEC correctly.
Step 2: Use a Firewall to Block Unwanted Access
A firewall acts like a shield between your DNS server and any malicious traffic. By setting up a firewall, you can restrict which devices or networks can connect to your server.
- What it does: A firewall monitors incoming and outgoing traffic and blocks harmful connections.
- Why it’s important: It prevents unauthorized users from attacking your server, which is one of the most common methods for hacking.
How to Set It Up:
- Ensure your DNS server has a properly configured firewall.
- Only allow trusted IP addresses to access your DNS server.
- Regularly review firewall settings to make sure they’re up-to-date.
Step 3: Keep Your Software Up to Date
Outdated software can have weaknesses that hackers can exploit. By keeping your DNS server software updated, you’re making sure any security flaws are fixed.
- What it does: Software updates often contain security patches that fix known vulnerabilities.
- Why it’s important: Hackers frequently target outdated software because it’s easier to break into.
How to Set It Up:
- Regularly check for software updates for your DNS server software.
- Set your system to automatically update whenever possible.
- Stay informed about new security patches released for your server software.
Step 4: Implement Access Control
Access control means controlling who can use and manage your DNS server. By setting strict rules on who can access the server, you limit the risk of unauthorized users.
- What it does: Access control ensures that only authorized people can make changes to your DNS settings.
- Why it’s important: Giving unauthorized users access can lead to serious security issues, like DNS poisoning.
How to Set It Up:
- Set strong passwords for accounts that manage your DNS server.
- Use two-factor authentication (2FA) to add an extra layer of protection.
- Regularly review who has access to your DNS server and remove unnecessary accounts.
Step 5: Monitor DNS Traffic
Regularly monitoring your DNS traffic can help you spot unusual activity before it becomes a bigger issue. Keeping an eye on traffic helps you stay ahead of potential threats.
- What it does: Monitoring tracks all DNS requests made to your server and alerts you to any suspicious behavior.
- Why it’s important: By spotting strange activity early, you can prevent attacks before they cause harm.
How to Set It Up:
- Set up monitoring tools to track DNS traffic and logs.
- Look for unusual spikes in traffic, especially from unfamiliar IP addresses.
- Regularly review traffic logs for any signs of an attack or breach.
Step 6: Use Rate Limiting
Rate limiting is like setting speed limits for how many requests can be made to your DNS server within a certain time frame. This helps prevent attackers from flooding your server with too many requests, which could crash it.
- What it does: It limits the number of DNS queries that can be processed over a period of time.
- Why it’s important: It stops attackers from using what’s known as a “DDoS attack” (Distributed Denial of Service) to overwhelm your server.
How to Set It Up:
- Configure your DNS server to limit the number of requests it will process from each IP address.
- Set thresholds that make sense based on your server’s normal traffic patterns.
- Monitor the rate limits regularly to make sure they’re working correctly.
Step 7: Disable Unnecessary Services
Many DNS servers come with extra features that you may not need. Turning off unused services helps reduce the number of potential entry points for attackers.
- What it does: Disabling unnecessary services limits the functionality of your DNS server to just what’s required.
- Why it’s important: The fewer features your DNS server has, the fewer opportunities hackers have to exploit it.
How to Set It Up:
- Review your DNS server’s settings and disable any features or services that you don’t use.
- If you don’t need things like DNS recursion or zone transfers, turn them off.
Conclusion
Securing your DNS server might seem like a big task, but breaking it down into simple steps makes it manageable. By following these tips—using DNSSEC, setting up firewalls, keeping your software updated, and monitoring traffic—you’ll make your server much harder for hackers to break into. Remember, staying proactive and regularly reviewing your security settings will help keep your network safe in the long run.