How to perform a DNS zone transfer?
A DNS (Domain Name System) zone transfer is a process used by DNS servers to copy the contents of one zone file to another. It helps maintain consistency across multiple servers, ensuring they all have the same data about a domain. While this can be important for network administration, it’s also something that anyone managing a domain should understand. Let’s walk through it in simple terms so that anyone can grasp the process.
What is a DNS Zone?
Before diving into the transfer, it’s important to understand what a DNS zone is.
A DNS zone is essentially a portion of the DNS database that is managed by a specific organization or administrator. It contains information about domain names and their corresponding IP addresses, including records like:
- A records (mapping domain names to IP addresses)
- MX records (mail exchange servers)
- CNAME records (aliases for domain names)
When you set up a domain, your DNS zone is where all the necessary records for that domain live.
What is a DNS Zone Transfer?
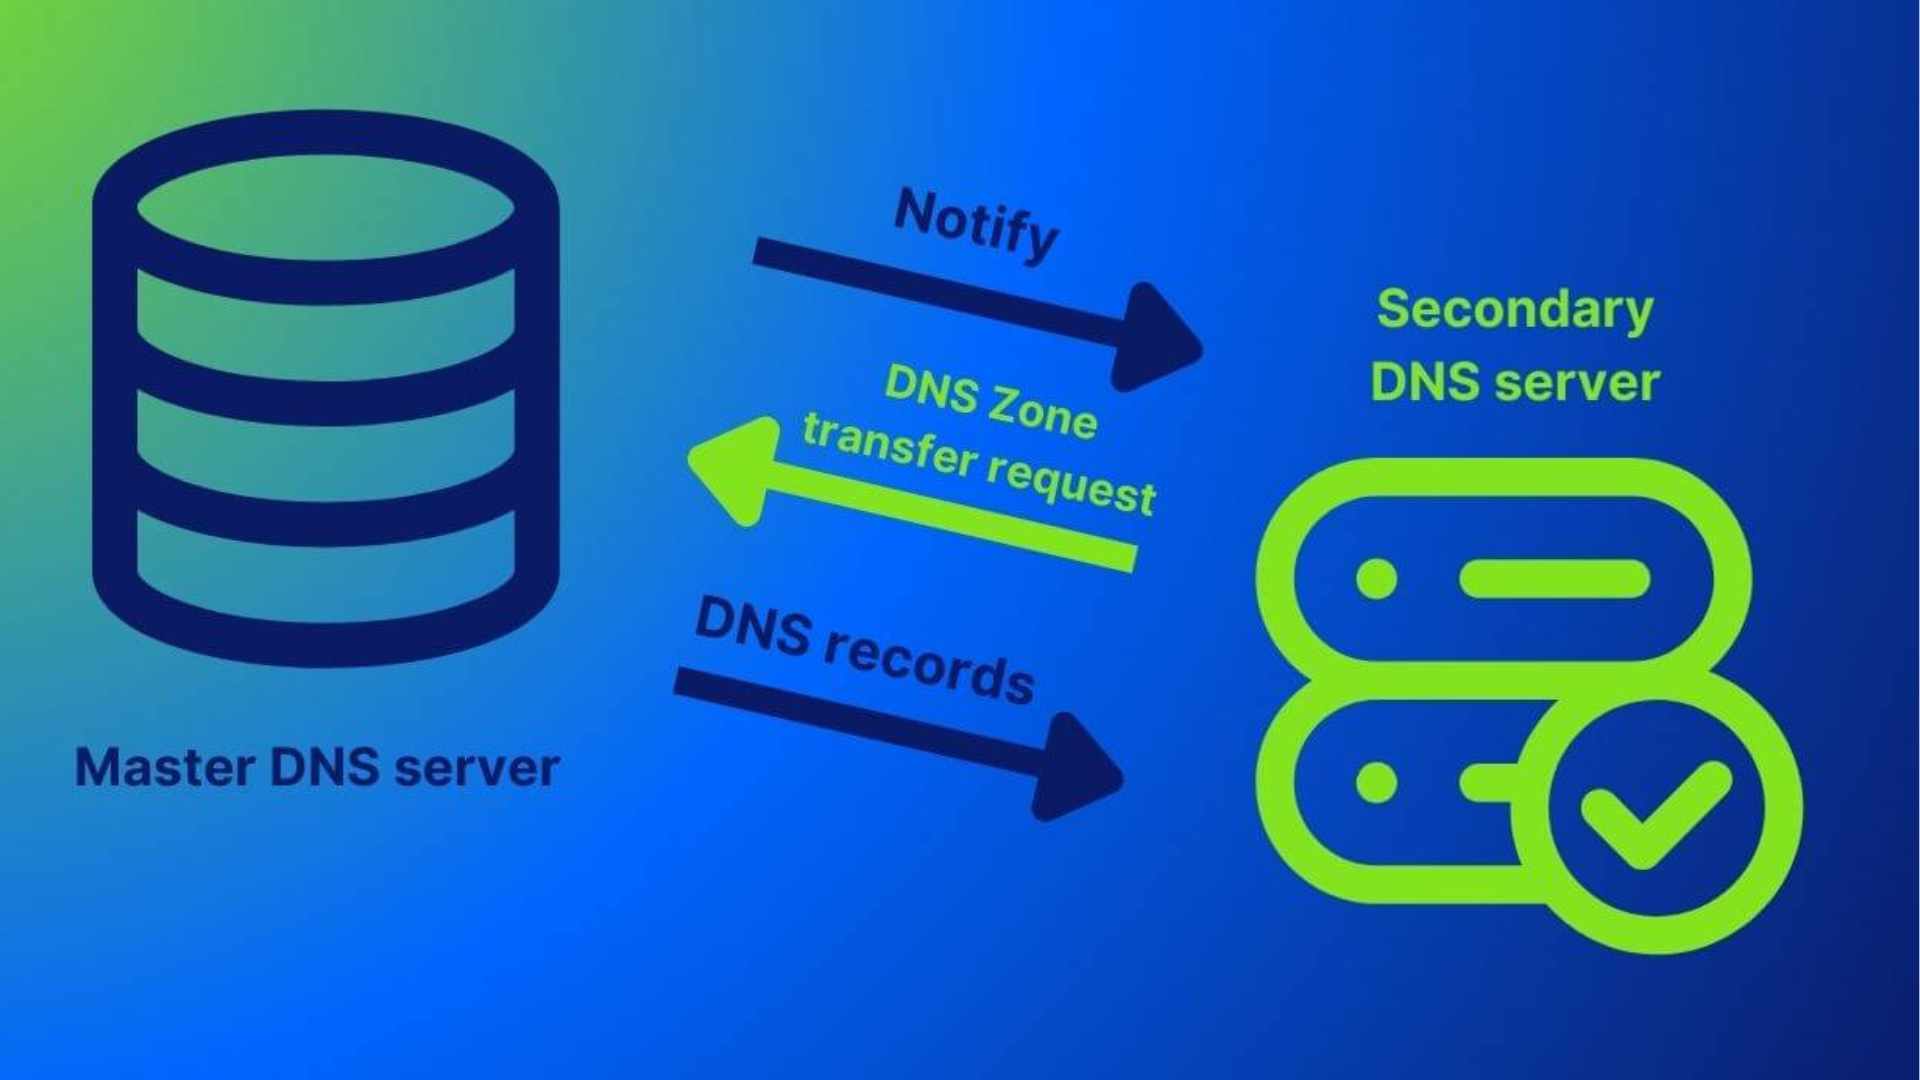
A DNS zone transfer is the process where a DNS server sends a copy of its zone file to another DNS server. This is done so that other DNS servers can keep up to date with any changes made in the original zone.
There are two main types of DNS zone transfers:
- Full Zone Transfer (AXFR): This is where the entire zone file is copied.
- Incremental Zone Transfer (IXFR): This only transfers changes that have been made since the last update, making it more efficient.
These transfers typically occur between primary and secondary DNS servers.
Why Perform a DNS Zone Transfer?
The purpose of a zone transfer is to ensure that all DNS servers serving a particular domain are consistent with the same data. It’s also a way of backing up the DNS zone file. By performing zone transfers, administrators can:
- Keep DNS records consistent across different servers.
- Backup DNS records for recovery in case of data loss.
- Help DNS servers to be more reliable by distributing the DNS load.
How to Perform a DNS Zone Transfer
Here’s a simple guide on how to perform a DNS zone transfer, broken down into easy steps.
Step 1: Set Up DNS Servers
You’ll need at least two DNS servers:
- Primary DNS Server: This is where the original zone file resides.
- Secondary DNS Server: This server will receive the zone transfer.
Both of these servers should be configured properly, with the secondary DNS server set to accept the zone transfer.
Step 2: Configure Zone Transfer Settings
On your primary DNS server, you need to allow zone transfers to the secondary DNS server. This is typically done by adding the IP address of the secondary DNS server to the list of allowed servers.
For example, if you’re using BIND (a popular DNS software), this would be in the configuration file (named.conf). You would add something like this:
zone "example.com" IN {
    type master;
    file "db.example.com";
    allow-transfer { 192.168.1.2; };  // IP of secondary DNS
};
This ensures that only the secondary server with the IP 192.168.1.2 is allowed to request the zone file.
Step 3: Initiate the Zone Transfer
Once your servers are set up, you can manually initiate the zone transfer. This can be done using various tools, depending on what software you’re using.
Using dig (Domain Information Groper)
On the command line, you can use dig to query the DNS server and initiate a zone transfer. The command looks like this:
dig AXFR example.com @primary_dns_server_ipThis will request the entire zone file from the primary server (primary_dns_server_ip) for the domain example.com.
Using nslookup
Another tool for querying DNS records is nslookup. You can perform a zone transfer using the following command:
nslookup
> server primary_dns_server_ip
> set type=any
> ls -d example.com
This will show the records for example.com and can be used to perform a basic zone transfer.
Step 4: Verify the Transfer
Once the zone transfer is completed, you’ll want to verify that the secondary DNS server now has the correct data. You can use the same dig or nslookup tools to check the records on the secondary DNS server.
For example, you can check that the secondary server has the same A records as the primary server by using:
dig @secondary_dns_server_ip example.com AThis should return the same records as the primary server.
Things to Consider When Performing a DNS Zone Transfer
While zone transfers can be helpful for consistency and backup, there are some important things to keep in mind:
Security Risks
If not properly secured, zone transfers can be a security risk. Unauthorized users could access your DNS data. To prevent this:
- Use access control to limit which servers can request a zone transfer.
- Use secure DNS (DNSSEC) to add an extra layer of security to your transfers.
Privacy Concerns
Performing zone transfers can expose sensitive information, such as internal hostnames, mail servers, and other records. Always be cautious about which servers are allowed to perform a zone transfer.
Monitoring and Regular Updates
Make sure to monitor your DNS servers regularly and update them to ensure the zone transfer is happening as expected. This helps keep your DNS information up-to-date and accurate.
Conclusion
Performing a DNS zone transfer is a straightforward process that helps keep DNS data consistent across multiple servers. It’s crucial for network administrators to understand how to set up and manage these transfers for both reliability and security. By following the steps above, anyone can execute a zone transfer and maintain a reliable DNS system for their domain.